Monday, May 9, 2016

Getting Ready for Mother's Day the Final Chapter

We had a great time on Mother's Day! My husband and I had 11 guests of family and friends.  I spent about 6 hours on Saturday preparing food that I could prepare ahead of time, decorating and setting the table. I have included pictures below of the rest of my preparation and the final result. In my blog on Friday, I gave you the recipe for the Lemon Thyme Cakes courtesy of marthastewart.com. If you are interested in the Summer Corn Chowder or the Asparagus Strawberry Salad with Orange Balsalmic Dressing, visit me on Pinterest under Lesley Stansfield. I have a "Soups On" board and a "Salads" board where you will find the recipes. I gave all the ladies and the girls, since they are future mothers, mini bouquets.

I made chicken salad and served it on croissants and made sliders to put on dollar rolls.


It's going fast!!


Over the winter, I cultivated succulents from the plants that I had outside last summer. I gave the 3 other moms, who were our guests, a potted succulent. 

I hope you enjoyed seeing how my family friends and I celebrated Mother's Day this year. Visit me on Pinterest for the recipes that I used.

Friday, May 6, 2016

Getting Ready for Mother's Day continued


It's Friday afternoon and I've decided to go ahead and make the lemon thyme cakes. They should store well until Sunday. There is a glaze that you drizzle over the cakes but I think I will wait until late Saturday evening or first thing Sunday morning to add that.

Below is the recipe. I found it on Pinterest complements of Martha Stuart.com I've just made a couple of slight adjustments, one adjustment to the length of baking time. The recipe says to bake for 40 minutes but after 26 minutes, they were done. I would suggest at 25 minutes to check the cakes. Insert a toothpick and if it comes out clean then remove them from the oven. Depending on how your oven baked it might take the full 40 minutes.

Lemon Thyme Cakes:

18 tablespoons of unsalted butter, softened

1 1/2 cups all-purpose flour

12 sprigs fresh lemon time plus more for garnish

1/2 teaspoon salt

Finally grated zest of one lemon (about 2 teaspoons of zest)

1 1/4 cups sugar

1/2 teaspoon vanilla

6 large eggs, room temperature

Preheat oven to 350°. Butter 6, 1 cup molds of a mini angel food cake pan or a mini Bundt pan. Dust with flour, and tapped out excess. Pick 2 teaspoons of small sprigs from the tops of the lemon thyme sprigs and divide evenly among the molds and set aside.

Coarsely chop the remaining lemon thyme leaves, in a small bowl add the thyme to the salt and flour. Set aside.

Put the butter into a bowl and with an electric mixer, cream on medium speed until pale and fluffy, scraping down sides of bowl as needed, about 4 minutes. Add sugar. Mix until pale and fluffy, scraping down sides of bowl as needed, about 3 minutes.

Mix in vanilla. Add eggs, 1 at a time, mixing well after each addition; mix until smooth. Reduce speed to low. Add flour mixture in three batches, mixing until just combined after each addition.

Spoon batter over lemon thyme in prepared molds. Smooth tops using a small rubber spatula. Firmly tap the pan on counter to eliminate any air bubbles.
Bake until a cake tester or toothpick inserted into centers comes out clean, 25 to 40 minutes. Let cakes cool slightly in pan on a wire rack, about 10 minutes. Running knife around edges of molds to loosen; Unmold cakes. Place each cake on a serving plate and drizzle each cake with about 1 tablespoon of the syrup. Garnish with lemon thyme sprigs.

Muscat and Lemon Thyme Syrup:

3/4 Cup Muscat wine

1/2 Cup + 2 tablespoons sugar

12 sprigs fresh lemon thyme

Store wine, sugar, lemon thyme, and a 1/4 cup of water in a sauce pan. Bring to a simmer over medium high heat. Reduce heat to medium low; simmer 20 minutes.

Pour syrup through a fine sieve into a bowl; discard the lemon thyme. Let cool slightly, about five minutes, before drizzling over the cakes. Syrup can be refrigerated in an airtight container up to one week; re-heat over medium low heat before using.


Thursday, May 5, 2016

Getting Ready for Mother's Day


I love entertaining and I love fresh flowers. Now I won't say that my flower arranging is as good as a florist but I think I do a pretty good job. I will be adding to this post as the weekend goes on as I prepare food, decorating and gifts for my Mother's Day celebration with family and friends.

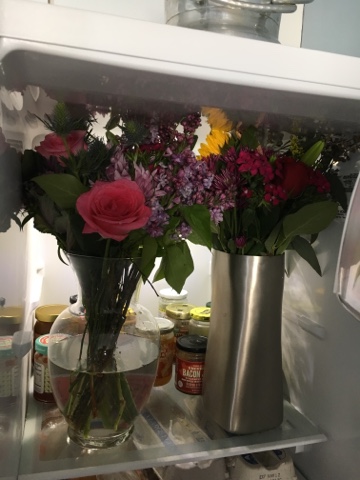
Today is Thursday, three days before Mother's Day. I found the flowers that I want to use in vases and to make mini bouquets for the girls and ladies that will be at our home on Mother's Day. I want to make sure that they stay fresh until I decorate and make the bouquets on Saturday. I cut a little bit off the end of each stem, placed them in water in large vases, and made room in my refrigerator to store them for a couple of days.


A florist told me the other day to make sure you do not have apples in your refrigerator. There is a gas that apples release that will cause the flowers to wilt quicker.

Monday, April 4, 2016

Coconut Chicken with Mango-Strawberry Salsa

Make the salsa before you start the chicken so it has time to infuse the flavors

2 chicken breasts, pounded and sliced into tenderloins

In a bowl mix together 1 FINELY chopped shallot, 1 tablespoon garlic salt, 1/2 cup cornstarch

In another bowl add 2 eggs,  whisk together

In a third bowl mix together 1 cup Panko, 1 cup coconut, 1 teaspoon paprika

First dip chicken tenders in the cornstarch mixture, then the egg, and then the Panko mixture. Place on a greased cookie sheet. Salt and pepper to taste. Bake at 400° for 20 min until golden brown. Serve with the salsa

Mango Strawberry Salsa:

1 cup mango finely chopped
1 cup strawberries finely chopped
1 small shallot finely chopped
2 tablespoons chopped cilantro
Juice of 1 small lime
Salt and pepper to taste

Let set at least 20 minutes 


I served this with IKEA'S Gronsakskaka
Vegetable cakes


Courtesy of Cheryl's Home Cooking

Tuesday, March 15, 2016

Ready For Spring


I love decorating especially for spring. 
💐🌿🌺🐣


HONEY GLAZED SALMON

My daughter sent me this recipe from Pinterest (courtesy of damndelicious.net). It is amazing and so easy to prepare without much time on that evening you are working late but want a home cooked meal. 


4 salmon filets
Kosher salt and freshly ground black pepper, to taste
4 tablespoons all-purpose flour
4 tablespoons honey
2 tablespoons olive oil
zest of 1 lime

For the browned butter lime sauce

6 tablespoons unsalted butter
2 cloves garlic, pressed
1 tablespoon honey
Juice of 1 lime
Kosher salt and freshly ground black pepper, to taste 

Preheat oven to 400 degrees F. 

To make the browned butter lime sauce, melt butter in a medium saucepan over medium heat. Cook, whisking constantly, until the foam subsides and the butter begins to turn golden brown, about 3 minutes. Stir in garlic, honey, and lime juice, salt and pepper, to taste; set aside. 

Season salmon with salt and pepper, to taste. Dredge each salmon filet with 1 tablespoon flour and drizzle with 1 tablespoon honey. 

Heat olive oil in a large oven-proof skillet over medium high heat. Add salmon to skillet and sear both sides until golden brown, about 1-2 minutes per side.

Place into oven and bake until cooked through, about 8-10 minutes. 

Serve immediately on top of brown rice, drizzle salmon with browned butter lime sauce and lime zest. 

Recipe adapted from damndelicious.net

Tuesday, March 1, 2016

Tilapia With Lemon Cream Sauce


This recipe is so amazing and does not take very long to prepare. An FYI about preparing fish or other types of meat, let the meat or fish set out for 20-30 minutes at room temperature before cooking. The meat or fish will cook more evenly. 


Make the lemon cream sauce first. You can let it set in the pan on low while you are preparing the fish.

Lemon Cream Sauce:

3 tablespoons butter
2 tablespoons flour
1 1/2 cups milk
1 clove garlic
Salt and pepper to taste
Juice from 1/2 lemon

To make the sauce, melt 3 tablespoons of butter in a small skillet or sauce pan. Add the clove of garlic, sauté the garlic for 2 minutes. Then add the 2 tablespoons of flour to the butter in stir consistently and let the mixture bubble for about 1 minute. Add the milk stirring constantly, letting the sauce come back to a rolling boil for 1 to 2 minutes. Add salt and pepper to taste. Turn the sauce to low, add the lemon juice from 1/2 a lemon. Stir the sauce and let set while you prepare the fish. 

For the fish:

2-4 pieces tilapia
2 tablespoons flour
1 teaspoon lemon pepper seasoning
1 cup Panko bread crumbs
1 egg
2 tablespoons olive oil

On a plate, mix together 2 tablespoons of flour, 1 cup Panko bread crumbs, 1 1/2 teaspoons lemon pepper seasoning. In a bowl, beat an egg with a fork. Heat the olive oil in a large skillet. Dip the pieces of fish in the bowl with the egg, coat both sides, then dredge the fish through the flour mixture on the plate. Coat both sides of the fish. Place the fish in the heated skillet. I usually cook fish for 6 minutes of each side depending on the size of the pieces. Make sure your skillet is hot enough to pan sear the fish to a golden brown. Setting the cooking unit between medium-medium high should be hot enough. After I turn the fish, I usually turn the heat down to medium to finish the fish so not to burn. 

The flour mixture is enough to coat 2-4 pieces of fish. If you do not like tilapia you can also use cod, sole, salmon or your favorite fish.

Place the prepared fish on a plate and drizzle with the cream sauce.


Recipe adapted from justgetoffyourbuttandbake.com


Tuesday, February 23, 2016

Tilapia Wrapped in Prosciutto with Lentils

I enjoy creating recipes by taking ingredients that I love and experimenting with them and coming up with a recipe that has so much flavor and excites the taste buds.  If you want a dinner that is delicious and only takes about 30 minutes to prepare, try this recipe. You won't be disappointed.


For the lentils:

3/4 cup of dry lentils
1 1/2 cups of vegetable broth (I use "Better than Bouillon" brand by adding 1 heaping teaspoon of the 
                                                  Bouillon paste to 1 1/2 cups water, or just use another brand of 
                                                  vegetable broth)
1/2 cup chopped leek or onion
1 medium carrot sliced in to small pieces
2 tablespoons of roughly chopped fresh tarragon
2 tablespoons of fresh thyme

Place the ingredients in a sauce pan and bring to a boil, reduce the heat to medium and cook for 20 to 25 minutes or until the lentils are al dente.

While the lentils are cooking, prepare the tilapia:

2 pieces of tilapia
4 pieces of prosciutto, thinly sliced

Wrap 2 slices of the prosciutto around each piece of tilapia (see photos)
In a non-stick skillet, add about 1 tablespoon of olive oil. Heat the pan on medium high for 3 or 4 minutes to warm the pan and olive oil before adding the tilapia. Add the wrapped tilapia to the skillet. Turn the heat down to medium or just a little less than medium heat. Cook the fish for 6 minutes then turn the fish over in the skillet and cook for an additional 6 minutes. Serve the tilapia on top of the prepared lentils.

Serves 2


My Winter Blues Craft Projects

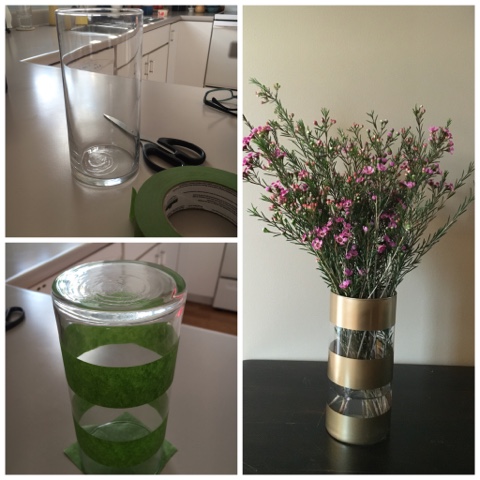
Ok, so I've been bored and I've been on Pinterest looking for some craft ideas. Usually I'm not a crafty person, but I do have a little bit of creativity. Below are pictures of my crafty side from this week! I already had the bookends from years ago. The bunnies ( which are a heavy foam material ) came from the dollar section at Target for $3 a piece. I purchased the vase from a dollar store for $1. I used Vaspar gold metallic spray paint from Lowes for each item. Another tip is to use Frog brand tape to tape your project. It is better for keeping the paint from seeping under the tape. If you decide to try the vase project, make sure your tape is straight for the strips and make a "cap" out of the tape to cover the bottom and the top of the vase to keep the paint from getting on the bottom of the vase and inside of the vase.

Happy crafting!!


Thursday, January 14, 2016

Beef Brisket Nachos

My husband and I had some beef brisket nachos at a restaurant a few weeks ago. They were amazing! This is my version,  I thought I would share it with you. Fixing a brisket is easier then you would think it just needs to cook for about 4 hours to make it very tender. Give this recipe a try, you won't be disappointed. 

NACHOS WITH BEEF BRISKET

3 lb beef brisket
1small onion, diced 
3 cloves garlic, cut in half 
Salt & black pepper, 1t. each

1/2 c brown sugar
2-12 ounce bottle chili sauce, 
    Reserving 1/2 cup
15 ounces stout beer
Tortilla chips 
Your favorite nacho toppings

Place the brisket in a Dutch oven or a deep roasting pan. Salt and pepper the brisket. Sprinkle the brown sugar over the brisket. Add the onion and  garlic to the Dutch oven, then pour the chili sauce over the brisket. Pour the beer around the brisket instead of over the brisket so the seasoning stays on top of the meat. Place the lid on your Dutch oven or aluminum foil over the roasting pan. Bake at 325° for 4 to 4 1/2 hours. Remove the brisket from the oven, transfer to a serving platter. Discard the liquid that is in the Dutch oven, it will be too greasy to use. Take two forks to pull the brisket apart into shreds then take a fork and knife and cut the brisket into  bite-size pieces. I then add an extra 1/2 cup of chili sauce to the cooked meat to add some extra flavor. Place tortilla chips onto a plate, add the chopped brisket,  then drizzle Mexican cheese dip or grated cheese and your favorite nacho toppings. You could also use soft tortilla shells or taco shells instead of making them in to nachos. Another way you could cook the brisket would be in a crockpot (on low). Increase the cook time to 6-7 hours.